Halter Ella
- May 12, 2025
- 2 min read
Updated: Jun 27, 2025
Make this oh-so-perfect summer dress using your Ella pattern. With some minor modifications, transform the top of the dress to be a halter. She will love dressing herself in this easy adaptation.
Shop the Look
Pattern: Ella
Fabric: Summer Sailboats (pictured on model), now in smaller scale Mini Summer Sailboats by Fabric Finders
*Available at childrenscornerstore.com while supplies last.
Supplies
Children’s Corner Ella
1/4" Elastic – 1/2 yard
Instructions
1. Trace the Ella Dress Back pattern piece. To create the new dress back, draw a line 1/2" above the armhole curve and extend the side seam. The new cutting line will start here and will be perpendicular to the “place on fold” line. Do not cut the armhole curve.

2. Cut 1 ruffle according to the chart below.

Construction
3. Press 1 long edge of the ruffle 1/8” to the wrong side. Press again 1/8". Top stitch hem.
4. Stitch ruffle to dress front with right sides together. Clip seam perpendicular 1/4” up from bottom of sleeve. Trim seam to 1/8” up to clipped seam allowance. Finish this seam with small zig zag (width 3.0mm x length 2.0mm). Press the seams toward the sleeves.

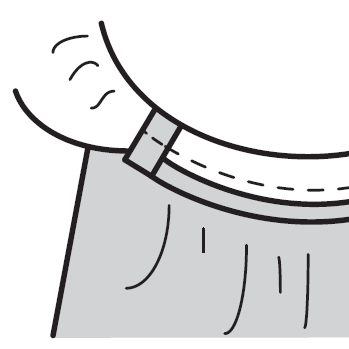
5. Cut 2 bias bands 3/4” wide and 1/2” longer than the front armhole curve. Press one long edge of the bias 1/4” to the wrong side. Pin the bias band to the under arm with right sides together. Leave 1/2” of the bias band overlapping the ruffle. Fold the short end of the band 1/4” to the wrong side. Stitch band to armhole curve. Clip seams. Fold the bias band to the wrong side of the dress and top stitch or whip stitch the band in place.


6. Press the top of dress back 1/8” to the wrong side. Press again 3/8”. Unfold. Stitch side seams
with right sides together. The back will extend 1/2" above the front at the armhole. Trim and finish seams.
7. Refold the top of the back dress and stitch across the back 3/8” from the top to form a casing.
8. For the back of the dress, cut 1/4” wide elastic the length required in the chart below. These elastic lengths are estimates, so if possible, try the garment on the child before stitching elastic in place.

9. Run elastic through back casing. Stitch each end of the elastic down at the side seam.
10. Finish the neck edge following the Ella instructions.
Adaptation by Susan Whitman


(pictured: larger scale, not in stock)

Click the printer icon below for printable version.
