Eleanor Flared Tunic
- Apr 17, 2023
- 3 min read
Updated: Jun 3, 2023
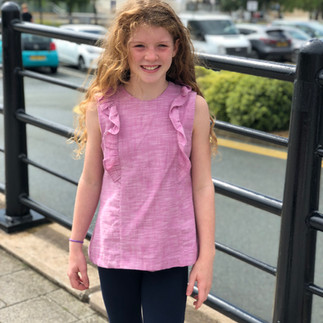
For the girl on the go, shorten the Eleanor dress to a tunic length and add this stylish ruffle. When paired with jeans or leggings she will love this frilly and fashionable top. I used Manchester in Violet from Robert Kaufman for this cute version.


Supplies
Eleanor Children’s Corner pattern Tracing paper
Cutting Instructions – Armhole and Hemline
1. Trace the top of the Eleanor View A center and side fronts and center and side backs on tracing paper shortening the pieces to the lengths in the table below. These measurements are from the cutting line on the high point of the shoulder to the cutting line at the hem, and allow for a 1” hem. Repeat with the lining.

2. On the dress front side, draw a dot one ½”-1” out and ½”-1” up (depending on the size you are making) from the new bottom of each side seam. Angle out the new side seam to this dot. Connect the new bottom to this dot making a slight curve. Repeat with back dress side and lining. 3. To adjust the armhole on the front and back bodice for a sleeveless top, refer to the chart below to raise the armhole and bring in the shoulder seam. Draw a dot making the shoulder seam shorter and raising the armhole.

4. Using a French curve, if you have one, draw the curve connecting these dots. If you do not have a French curve, you can simply follow the shape of the pattern armhole to connect the dots.

5. Cut the dress pieces according to the pattern.

Construction
1. Replace steps #4-11 from the Eleanor pattern with the following instructions. 2. Measure from the mid point on the shoulder to the lowest placement line for the tab. Multiply this number times 2. Now multiply this number by 1.75. This is the length of the ruffle. 3. Cut two ruffle pieces 2 ¼” wide by the length calculated. 4. Taper each end of the ruffle by cutting a curve, starting about 2" away from ends.
5. Hem the straight side of the ruffle with a shirt tail hem. 6. Mark the center of each ruffle using a fabric marker. Stitch a gathering stitch 1/8” from the ruffle curved edge and again 3/8” from the edge. 7. Stitch the shoulder seam of the View A dress center front and center back with right sides together. Press seam open. Repeat with other shoulder seam. 8. Gather the ruffle by pulling the bobbin threads at each end to fit between the lowest tab marks. Pin ruffle in place with right sides together, matching the center of the ruffle at the shoulder seam. As you pin, be sure to concentrate some extra gathers at each end of the ruffle. This will keep the ruffle from “cupping” in at the ends. Stitch in place. 9. Place dress side on dress center with right sides together, and pin in place with ruffle between. Stitch in place. Repeat with other side. Press seam towards center. 10. Continue to step 17 if doing a zipper or step 29 if doing buttons. 11. After sewing around neck (zipper #18, buttons #29), sew each armhole with right sides together. Clip seam allowances, and understitch if needed. Turn right side out by pulling each side of the back bodice through the shoulder seams and press.
12. Continue the instructions with step 33 skipping sleeve construction steps.
Adaptation by
Emily Douglas

Click the printer icon below for printable version.
