Eleanor with Ruffle
- Apr 26, 2025
- 2 min read
Updated: May 2, 2025
The princess lines in the Eleanor pattern provide a great place to add a ruffle to this A-line dress. We created the ruffle out of the same poly cotton as the dress, and trimmed it with Swiss trim to create this delicate look. With its perfect color and drape, you will want to use it for many projects.


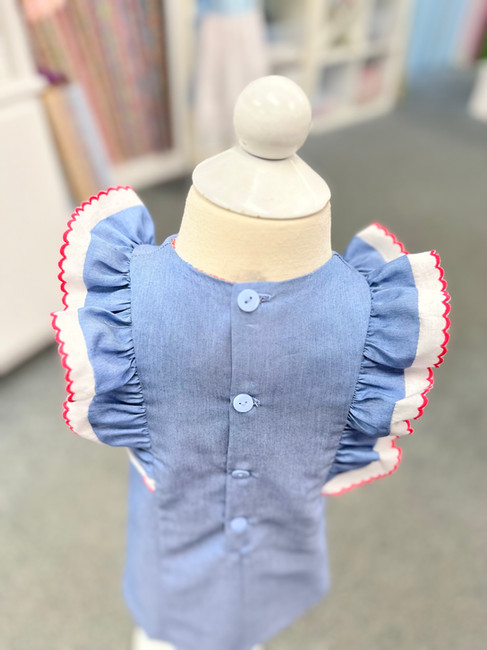
Featuring Poly Cotton Denim Indigo and red scalloped Swiss Edging, with shiny blue buttons. (2025)
Supplies
Children’s Corner Eleanor pattern View A Swiss Edging Tracing paper

Eleanor Tracing and Drafting
1. Trace Eleanor Front and Back Sides.
2. Trace Front and Back Linings
3. Include the lowest "Tab Placement Line"
Cutting Instructions
1. Adjust armhole curve on front and back sides and front and back linings. Refer to the chart below. Draw a dot making the shoulder seam shorter and a dot raising the armhole.

2. Using a French curve, if you have one, draw the curve connecting these dots. If you do not have a French curve, you can simply follow the shape of the pattern armhole to connect the dots.


Construction
1. Transfer all marks from pattern pieces to fabric.
2. Fuse a 1" wide strip of light weight interfacing to the wrong side of the back edge of the dress from the neckline to the large dot.
3. Taper each end of the ruffles by cutting a gentle curve starting 2" from the ends.

4. Place the right side of eyelet trim onto the straight edge of ruffle. Stitch using a 1/4" seam allowance. Trim to 1/8". The needle needs to swing off of the fabric as you stitch. This will allow the fabric to roll over the edge of the eyelet.
5. With the wrong side facing up, press the rolled edge toward the ruffle.
6. Stitch a gathering stitch 1/8” from the ruffle curved edge and again 3/8” from the edge.

7. Stitch shoulder seam of the center front with the two center backs with right sides together. Stitch the shoulder seams of the front sides to the back sides. Be sure these pieces are clearly marked on fabric.
8. Gather the ruffle by pulling the bobbin threads at each end to fit between the lowest tab marks on the front and back. as you pin, the ends of each ruffle will have more gathers so that the edging will lay flat without cupping up. Stitch in place.
9. Place the dress front and back sides onto the center front and backs with right sides together. Match the dots at the seam lines. Repeat with the other set of front and back sides. Trim seams and press the seam allowance toward the center.
10. Continue with Eleanor instructions. At step 29, stitch around each armhole before moving to step 30.
11. Before going onto step 31, trim and clip seam allowance. Turn dress right side out by pulling each back side through the shoulder seam. Press so that the lining doesn't show.
12. Continue with Eleanor instructions.
Adaptation by
Susan Whitman


Featuring discontinued fabric by Art Gallery and Swiss Embroidered Edging 48520 White trim. (2018)
*beautiful and playful photos captured by Amy Schuh

Click the printer icon below for printable version.