Allie with Pleated Skirt
- Apr 9, 2023
- 3 min read
Updated: May 31, 2023
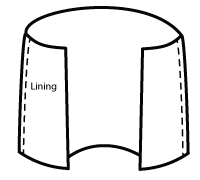
Allie is a versatile dress that we love! Consider adding a pleated skirt to the bodice achieving a polished dress your older girl will love.


Supplies
Children’s Corner Allie pattern Fashion Fabric: dress requirements plus ½ yard, except for sizes 4-14 when using 45” wide fabric. *we used Essex Yarn Dyed Metallic from Robert Kaufman Lining Fabric: same mount as the fashion fabric Marking Pen Tracing paper
Cutting Instructions
1. Trace Allie front and back dress pattern, stopping at the waist casing line. This will now be called the bodice.
2. To calculate the width of the front skirts, measure across the bottom of front bodice (including facing) add 6” to this measurement. This is the width of the 2 front skirts.

3. Measure across the bottom of the back bodice and multiply this measurement times 2. Add 9” to this measurement. This is the width of the back skirt.

4. To calculate the length of the skirt, you need your desired finished length or refer to the Allie pattern finished dress lengths. First, measure the finished length of bodice from seam line on top of shoulder to seam line at waist (remembering there is a ½” seam allowance at waist). Subtract this number from your desired finished dress length. Then add two inches for hem.


5. Cut two front skirts and one back skirt based on the calculations above.
6. Cut two front skirt linings 2” narrower than the newly calculated front skirts measurements.
7. Cut one back skirt lining the same as the newly calculated back skirt measurements.
8. Cut two bodice fronts and one back from dress fabric.
9. Cut a lining piece the same as the back bodice piece.

10. For bodice lining, measure the length and width of the front bodice, and add 1” to length and width. Cut 2 rectangles of lining fabric this measurement.
11. Stitch the lining rectangle to the front bodice with right sides together.

12. Press the seam toward the dress fabric, and press the bodice on the fold line with wrong sides together.

13. To create bodice lining, trim away the extra lining fabric using front bodice as template. Repeat with the other front bodice.
14. Cut collar according to the pattern.
Construction
1. Construct collar per pattern instructions.
2. Sew shoulder with right sides together. Repeat with lining. Press seams open.
3. Place collar on the right side of the neckline matching raw edges. Align collar center front on center front line and center back of collar on center back of bodice. Pin, and baste in place.

4. Fold yoke lining on top of collar with right sides together and neck edges aligned. Match shoulder seams. Collar will be between fabric and lining. Stitch around neck. Clip seams, and trim to 1/8”. Turn to right side, and press.

5. Turn wrong side out with right sides together. Stitch each armhole, clip seams, and turn right side out through each shoulder.
6. Separate side seam of dress. Place dress-to-dress and lining-to-lining with right sides together and matching underarm seams. Stitch down the lining and up the dress. Press seams open. Repeat with other side. Turn right side out.
7. Stitch skirt side seams with right sides together. Repeat with lining.

8. Stitch skirt to lining down the front facing edge.
9. Turn right side out and press. Skirt facing will fold to wrong side. Baste across top of skirt and lining. Treat as one fabric.

Making the Pleats
1. Measure from front fold 5” and make a small mark with a fabric pen.

2. Measure from skirt side seam 3 ½” toward the front and 3 ½” toward the back and make a small. Repeat on the other side seam and center back.

3. Label these lines “B”.

4. Go back to each line, measure 1 ½” to each side, and make a mark. Label these lines A for all pleats.

5. Place line A onto Line B to form the pleats. Press. Baste across to hold pleats in place.

6. Stitch skirt to bodice with bodice with right sides together keeping facing and lining loose. Fold bodice lining up ½” and whip stitch to the seam line.
7. Follow dress buttonhole and hemming instructions from the Allie pattern, using a 2” hem.
Adapted by
Susan Whitman

Click the printer icon below for printable version.
