Nora Nightgown
- Apr 22, 2023
- 2 min read
Updated: Jun 5, 2023
Playtime at home is best when you get to stay in your pajamas. This nightgown starts with the Nora pattern and adds length and a darling ruffle. Shop this sweet Peter Pan knit, while supplies last!


Supplies
Children’s Corner Nora pattern Additional 1/4 yard of nightgown knit fabric
Cutting Instructions
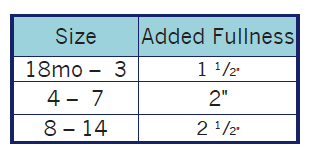
1. Trace the Nora long sleeve pattern. Draw a line from the high point on the sleeve to the bottom cutting line. Cut on this line so that you can split the sleeve pattern and add some fullness. Place a strip of tracing paper between the 2 sleeve pieces and tape in place. Refer to the chart to know how much fullness to add. Draw underarm seams straight down.


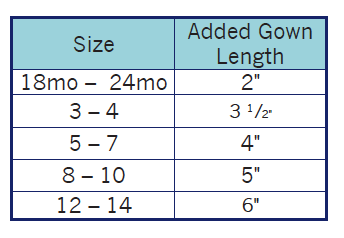
2. Add length to the gown by continuing the angle at the side seams. Refer to the chart for a suggested amount of length to add to the dress front and back.


3. Cut 2 strips of fabric for the hem ruffle. Measure the bottom of the front and back of the gown. Multiply this measurement by 1.75. Refer to the chart for the appropriate width to cut the ruffle pieces.

Construction
1. As you begin step 1 of sleeve construction for Nora, sew two lines of gathering stitches between X’s at top of sleeve. Stitch the first line 1/8” from raw edge and second line 3/8” from raw edge using 3.5mm stitch length to help keep gathers in place. Repeat with other sleeve.
2. Continue instructions through step 3 including finishing sleeved edge and sewing the sleeve into the dress. Do not sew together side seams.
3. With a fabric marker, draw a line on the wrong side of the sleeve 1” from the bottom edge. Cut two pieces of flat 1/8” elastic according to chart. Place elastic on the wrong side of sleeves 1/2” from bottom edge. Tack elastic using 4-5 straight stitches. Stitch the remaining elastic with a zig zag across elastic (width of 5mm and length of 2.5mm). Pull up elastic as you stitch to fit length of fabric. Be careful not to catch elastic while stitching. Pull 1” of elastic out when you are 1” from the edge of the fabric. Return to a straight stitch and stitch down the last 1/2” on the center of elastic, and backstitch to secure this end. Trim excess elastic. Repeat with the other sleeve.

4. Finish the edge of the ruffles with a serger. Press towards the wrong side and topstitch in place.
5. Sew two lines of gathering stitches on raw edge of ruffle. Stitch the first line 1/8” from raw edge and second line 3/8” from raw edge using 3.5mm stitch length. Gather the ruffle and stitch with right sides together to the front and back dress.
6. Stitch the side and underarm seams with right sides together of the dress. Finish seams with serger.
Adaptation by Susan Whitman

Click the printer icon below for printable version.
